🔥 Setting up a VPN Solution for API Integration
The company (my client) contacted me to set up a VPN solution to make API requests from their premises and production machines to a server requiring an IKEv2/IPSec VPN connection.
This is a wealth management and financial investment company that offers financial products to their clients.
They recently signed a collaboration agreement with a major financial group (the API provider). The company offers this financial group’s products in their client catalog.
For the end client to be able to perform online price simulations, they need to integrate the financial group’s catalog into their website through an API.
The only issue is that this API is only accessible through VPN.
Since developers work from their workstations and Heroku instances, installing a VPN directly on their computers wasn’t a solution.
After consideration and taking into account the client’s needs, I decided to create an AWS infrastructure to solve this problem.
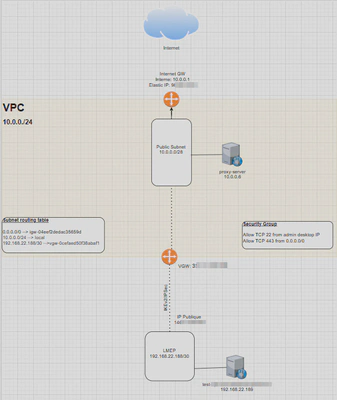
I first created a network environment with a default gateway (IGW) and a VPN gateway.
In this environment, I placed an Ubuntu server 22.04 EC2 Instance to act as a reverse proxy.
Then I pointed a domain name specific to the company towards this EC2 instance.
So whenever an API request is made with our domain name, the proxy (which is connected to the financial group’s VPN) changes the URL so that the endpoint’s domain name is called with the correct URL.
This way, my client can make API requests from any workstation or cloud instance using only their domain name.
I solved this problem in 3 steps:
- Infrastructure creation
- VPN configuration
- Reverse proxy creation and configuration
1) Infrastructure creation on AWS
In this step, we need to create the “terrain” for everything to work correctly.
Zone change
We will start by changing the zone. Personally, if I have the choice, I prefer to build projects on zones in the USA (for example, N. Virginia) instead of Europe, as some products are not available, such as t2.micro.
VPC creation
I choose a /24 block that will be sufficiently large for 1 VM on the project!

Subnet creation
In this /24 block CIDR, I fragment it into a /28 sub-domain, which gives me a range of 16 IP addresses.
(Question: How many /28 sub-domains can I create in the /24 block CIDR? Answer: In a /24 block CIDR with a range of 256 IP addresses, I can create 16 sub-networks /28, each containing 16 IP addresses)
I would have liked to create a /30 sub-domain to give me only 4 addresses IP, but AWS does not accept beyond 28/

IGW (Internet GateWay) creation
This is the default gateway for our entire set.

Attach it to the correct VPC

Route tables creation
We will create the routing rules for the entire VPC. By default, we have the route that allows access to the entire /24 block 10.0.0.0/24 —> local
We will add, first, the route to access the outside of the network (i.e., the Internet). For all routes corresponding to the destination 0.0.0.0/0, which represents the entire Internet traffic, this traffic will be directed via the Internet Gateway.

2) Tunnel VPN IKEv2/IPSec
In this step, I will create the part that concerns me for the establishment of the VPN tunnel IKEv2/IPSec. Here is the provided checklist for tunnel creation:

Custommer Gateways creation
We enter the public IP of our partner at the other end of the tunnel

VPG (Virtual Private Gateway) creation
Then we name our VPG (Virtual Private Gateway) and attach it to our VPC

VPN connection creation

Static IP prefixes correspond to the IP ranges that can access your site through the tunnel. In our case, 192.168.22.188/30 is the LAN of our partner 10.0.0.0/28 is our LAN

At the tunnel options level, you will enter the PSK (Pre Shared Key) which allows the authentication of the VPN tunnel

At the end of these steps, AWS creates 2 VPN tunnels with 2 different IPs. In my case, I shared only the second IP. You can share both and have more redundancy. If one tunnel is no longer active, the second one takes over.

Modify the routing table
You need to modify the routing table of the VPC so that packets destined for 192.168.22.188/30 (the LAN of the other end of the tunnel) pass through the VPG (Virtual Private Gateway)
The rule will be as follows: 192.168.22.188/30 —→ vgw-xxxxxxxx
3) Reverse Proxy creation
We only need to create and configure the reverse proxy that will be responsible for modifying the web domain in the API requests.
Imagine that the official API endpoint is: api.company.com/edp/products We can only access this endpoint through VPN. However, if I’m at home, I can’t access this API. I need an intermediary who will be well connected to the VPN and also connected to the Internet. Therefore, this reverse proxy will act as a bridge (the messenger) between the VPN at home and my domain name.
VM Ubuntu creation
We will search in the AMI catalog for an Ubuntu 22.04 or 24.04 in 64-bit (x86)

Give it a name

Choose a t2.micro instance

Create a key pair (private, public). If you use Putty as the SSH client, use .ppk if you use the CMD or a bash terminal, use .pem

The file will be downloaded to your computer. Keep it carefully as you won’t be able to connect to your VM without it.
At the network settings level: Choose the correct VPC and subnet, then create a new security group with only 2 rules.
SSH from your public IP to administer your VM
and HTTPS anywhere to allow packets from your API requests to pass
You can add ICMP for pings if needed and test the VPN tunnels with your partner.

Then create the instance:

Assign a fixed external IP to our VM with Elastic IP

and associate this IP with your new instance (VM).

Configure the reverse proxy
In this step, we need to point our sub-domain to the public IP of our VM.
To do this, you need to go to your domain registrar’s interface (OVH, Route53, Gandi, etc.) and create an A type entry with your sub-domain (ex: apitest.lousques.com) that points to the IP of your VM
Configure the VM
Once these steps are completed and the VM is up and running, you can connect to it via a terminal with the following command:
ssh -i /path/to/your/key.pem user@ip-or-domain
example: ssh -i c:\Downloads\ubuntu-key.pem ubuntu@32.15.65.22
ubuntu is the username of your VM
You will start by updating the VM with this command:
sudo apt update
Install nginx which will act as the reverse proxysudo apt install nginx
We will immediately create a backup of the default file in /etc/nginx/sites-vailable/default
with this command sudo cp default default.bak

Installing Certbot for SSL certificate
sudo apt install python3-certbot-nginx
certbot --version

Obtain and install the SSL certificate:
sudo certbot --nginx -d apitest.louisques.fr
Enter your email address and answer yes/no to certain questions.

Modify the Nginx configuration file
We will now transform nginx into a reverse proxy. Return to the default file in /etc/ngnix/sites-available/default and open it:
sudo nano default
(Replace apitest.louisques.fr with your sub-domain)
server {
listen 80;
server_name apitest.louisques.fr;
return 301 https://$host$request_uri;
}

server {
listen 443 ssl;
server_name apitest.louisques.fr;

ssl_certificate /etc/letsencrypt/live/apitest.louisques.fr/fullchain.pem; # Managed by Certbot
ssl_certificate_key /etc/letsencrypt/live/apitest.louisques.fr/privkey.pem; # Managed by Certbot

location / {
proxy_pass https://apitest.louisques.fr:
proxy_set_header Host apitest.louisques.fr;
proxy_set_header X-Real-IP $remote_addr;
proxy_set_header X-Forwarded-For $proxy_add_x_forwarded_for;
proxy_set_header X-Forwarded-Proto $scheme;

}
}
Save and restart the nginx service
sudo systemctl reload nginx
Verify that the nginx files are readable and do not contain errors
sudo nginx -t
If everything is fine, we can proceed to the last step.
Modify the hosts file
Modify the hosts file of our Ubuntu to resolve the correct IP address from the domain provided by the reverse proxy.

All necessary steps have been completed to achieve this mission. Normally, at this stage, my client can make API requests from any workstation or cloud instance using a custom sub-domain and receive the response.