🧅 How to Create a Website on the DARK WEB (.ONION)

In this tutorial, we’ll create a website (.ONION) on the TOR network.I assume you already understand how the TOR network works and are only looking to create a webpage on the darkweb quickly and easily.Also, I assume you already have a DEBIAN Linux instance in the cloud ready to host your new .onion site.Regarding the instance, I used CONTABO cloud provider services.I chose the smallest VPS offering: the CLOUD VPS 1 at only €4.50/month with 4 vCPU Cores - 6 GB RAM and 400GB SSD.This is more than enough for our website.
1) Server Configuration
Let’s start by updating the repositories and installing the UFW firewall on Debiansudo apt update && sudo apt upgrade -ysudo apt install ufwCheck if UFW is active:sudo ufw statusBy default, it will probably be inactive after installation.Before enabling the firewall, make sure you don’t lock yourself out, especially if you’re connecting remotely via SSH. Allow SSH with:sudo ufw allow sshOnce your configuration is ready, enable UFW with:sudo ufw enableThen we finish by opening port 80 (http) to accept incoming web traffic on this portsudo ufw allow httpWith the TOR network, there’s no need to use an SSL certificate for secure web connections (https). Indeed, connections are already encrypted in the TOR network. Moreover, if users visit your site with TorBrowser, they won’t be notified about the absence of an SSL certificate. However, if users visit your .onion site from a regular browser connected to TOR, they might be alerted about the missing SSL certificate despite the encryption already present on the TOR network.
2) Installing TOR Service on DEBIAN
You’ll need some basic packages to manage repositories:sudo apt install -y apt-transport-https curl gpg
Add the Tor project signing key. This key verifies the authenticity of the Tor software package:curl https://deb.torproject.org/torproject.org/gpgkey | sudo gpg --dearmor -o /usr/share/keyrings/tor-archive-keyring.gpg
Add the Tor project repository:echo "deb [signed-by=/usr/share/keyrings/tor-archive-keyring.gpg] https://deb.torproject.org/torproject.org `lsb_release -cs` main" | sudo tee /etc/apt/sources.list.d/tor.list
Update the package list to include the new Tor repository:sudo apt update
Now, you can install the Tor package with its utilities:sudo apt install tor deb.torproject.org-keyring
Start the Tor service and ensure it runs at startup:sudo systemctl start torsudo systemctl enable tor
Verify that the Tor service is running with:sudo systemctl status tor
3) Configuring the torrc File
My goal in this tutorial is only to create a .ONION website. I absolutely don’t want to become a tor relay and even less become an exit relay! I don’t want any tor traffic passing through my server.
(For more information about tor operation and relays, here’s the official resource Types of Relays on the Tor Network)
So, we’ll configure the torrc file to only serve web pages on our port 80 (http).
sudo nano /etc/tor/torrc
SocksPort 0
ORPort 0
ExitPolicy reject *:*
ExtORPort 0
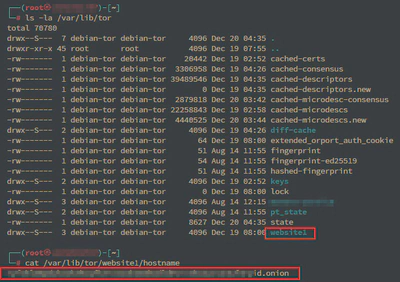
HiddenServiceDir /var/lib/tor/website1/
HiddenServicePort 80 127.0.0.1:80
Log notice file /var/log/tor/log
Save and exit nano
The first 4 lines prevent tor from using your server as a relay.HiddenServiceDir indicates the folder containing the cryptographic keys and other tor-related files for your “hidden service” (in our example, a website)HiddenServicePort indicates the internal mapping to serve your hidden services
Restart and enable the tor service:
sudo systemctl restart tor
When restarting the tor service, a website1 directory will be created in /var/lib/tor/
To view the directory contents, you must switch to root mode with the command su -
Understanding Port Mapping in Hidden Services
- Hidden Service Ports:In the torrc configuration file, each HiddenServicePort line specifies a mapping between a virtual port (seen by Tor users) and a local port on your server.
- Tor’s Role: When a user accesses your .onion service via a Tor browser, they make a request to the Tor network, which routes traffic to your server using the virtual port. Tor then reads your torrc configuration and redirects this request to the specified local port on your machine.
- How Traffic is Directed: The following line: HiddenServicePort 80 127.0.0.1:80 maps port 80 from the Tor network to port 80 on your machine. When a request is received on port 80 of the .onion address associated with this hidden service, Tor directs it to port 80 on localhost.
4) Installing NGINX Web Server
The final step is to install the web server.sudo apt install nginx
At this step, I always create a backup of the configuration file by renaming default to default.bak in the /etc/nginx/sites-available directory.
We can leave the file as is since it points directly to port 80.Then we start and enable the nginx service. During this activation, a symbolic link will be created between the sites-available and sites-enabled directories, which will activate your site.
By default, the directory to store your new site’s files is /var/www/html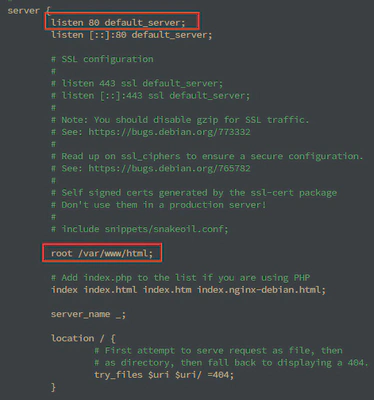
You can now visit my new site at this .onion link: ryfxklm6pduhzok3hcqfk3rvazok2m4hodldevrxtknaucv23uf4ryid.onion/
To access it, you must first connect to TOR either through the official tor browser or simply through a web browser like BRAVE which includes tor sessions.
5) Monitoring the TOR Service
To check the proper functioning and bandwidth of your server allocated to the TOR network, you can install NYX, a tor network monitoring tool on your server:sudo apt install nyx
then sudo nyx
This utility also helps us ensure and confirm that we’re not transiting any tor traffic other than serving our own web pages. nyx utility It consists of 5 pages in total. You press the right/left arrow on your keyboard to scroll through the different monitoring pages.
Conclusion
We’ve just created our site (1 page) on the darkweb in a simple and secure way. You can add other services by modifying the torrc file and adding new pairs of HiddenServiceDir/HiddenServicePort like this:
.
.
.
HiddenServiceDir /var/lib/tor/hidden_service1/
HiddenServicePort 80 127.0.0.1:8080

HiddenServiceDir /var/lib/tor/hidden_service2/
HiddenServicePort 80 127.0.0.1:8081

HiddenServiceDir /var/lib/tor/hidden_service3/
HiddenServicePort 80 127.0.0.1:8082
and by adding new configuration files in /etc/nginx/sites-available/ (default2, default3,…) taking care to change the port in the file.
If you have any questions or need more details, don’t hesitate to contact me!